Have you ever wanted to design an e-commerce website? Perhaps you already have but you’re not happy with the results. Either way, in our go-to guide to e-commerce website design, we use our experience and e-commerce expertise to help you follow a proper website design process. We also hope to help you from falling into any of the usual pitfalls along the road. We see people make the same mistakes time and time again and we don’t want you to do the same when designing e-commerce websites!
So, without further ado, let’s dive in.
Step 1 – Mapping Out Your Website Structure
I know what you’re thinking, surely the first step of our journey is to put together some wireframes to map out the framework of our key pages? Or maybe you’re expecting some UX principles or heuristic advice to keep you on track and maximise that all-important conversion rate. That, however, is a long way down the road.
In fact, the first step to a successful e-commerce website build is one that we see people omit entirely time and time again. The ironic thing is, it’s the most fundamental and an absolute non-negotiable. So, what exactly does it mean to map out a site structure, and why is it so important?
Good Website Structure Example
It’s probably best to show you. This is a site structure of the fictional bicycle company “Michael’s Cycles.” This is an example of a well-thought-out, logical site structure that helps the user easily navigate the site in a way that makes sense.

If you imagine the main topics are all found in the header of the website, you can see that what comes below them follows reason. Within the “All Bikes” section, you find three distinct bike categories with segmented products in each. You also have Michael’s key page “Repair Service” present along with a blog and a separate section on sustainable cycling – Michael’s very passionate about sustainability and uses it as a USP for his site; he constantly sends his visitors back to this section via social media and email marketing to strengthen his brand. He also has the key supporting pages “About Us” and “Contact Us” in the header.
Not only does this seem a very logical structure for users visiting the site, but search engine bots love this too. They understand how to get to every page, what it’s about, and can follow the structure very easily. This means that site structure before we even get on to “classic UX” affects the user experience and SEO before a single square or circle has been placed on a wireframe.
Bad Website Structure Example
Now take a look at a rival company, Neil’s Wheels:

Neil, for the sake of this example, happens to have all the same pages that Michael has on his site. However, the structure of this website is much more confusing, for visitors and crawler-bot alike.
Let’s look at the “All Bikes” section to start with. You can see that we have the mountain bikes and electric bikes categorised under the main “All Bikes” section as before, but now we have road bikes and Neil’s best-selling mountain bike – mountain bike A – in the header too. There are a number of reasons why Neil has decided to do this, perhaps he’s got a lot of road bikes in stock and he wants to draw more attention to them? Whatever the reason, it’s quite confusing to see an “all bikes” section in the header and find two pages that should logically fall somewhere under this section outside of it. Furthermore, Neil’s repair service is also under “All Bikes” despite it not being a bike! Confusing, eh?
If we now look at the blog, we’ve lost the main blog section altogether and now have blog articles in the header. Are these articles really all that important for them to be listed in the header? And now Neil’s “Sustainable Cycling ” section is under “About Us,” which sort of makes sense but I would argue this is better suited to being a main option in the header. Finally, “Shipping Info” and “Terms & Conditions” have made their way into the header when they should really be in the footer. These are not key pages on the site, necessary – yes, but not strong indicators to search engines about what Neil’s site is all about, and not particularly interesting to a visitor unless they’re looking for them specifically (and the first place they’d go is likely to be the footer in any case).
How Website Structure Helps with the Customer Acquisition Funnel
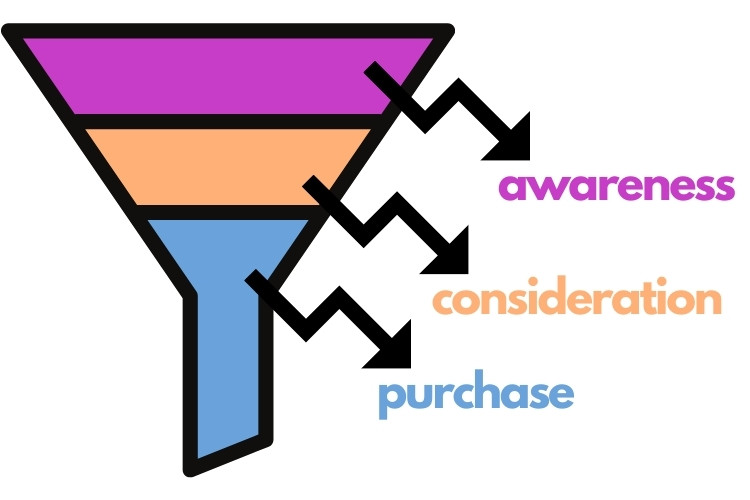
If you’ve worked in marketing or business development before, you’re likely to have heard of the customer acquisition funnel. This maps out the typical customer journey from the awareness stage, when they first hear about the product they want to buy, to the purchase stage. Of course, you can break down the funnel into many iterative stages, but for this example, we’ll just focus on the three stages in the diagram below: awareness, consideration and purchase.

So what’s the relevance to our foundational website structure? Well, we can map out which pages of the website are related to what stage of the acquisition funnel and, from there, work out where we want website visitors to go having arrived on a specific page. If you take a look at the below diagram of Michael’s Cycles, you can see that the customer journey is fully visualised.

The blog pages are highlighted in purple as this correlates with the awareness stage. This is the kind of page that the customer is landing on if they are still considering whether to invest in a new bike or not. Perhaps they’re searching for terms like “health benefits of cycling to work” or “is cycling sustainable?” The pages highlighted in orange are the product and product category pages. This is because the visitor has already made up their mind that they are going to buy a bike at some point, but are now researching to find out which to buy. Visitors may land on these pages directly or may reach here having come from another page on Michael’s website that features earlier in the customer acquisition channel.
Finally, you have the checkout page, which should be self-explanatory and is only reached having visited the product pages and added a product to the cart. The homepage is a bit of a maverick when it comes to the customer acquisition funnel, as people may reach here at many different stages of the customer acquisition funnel.
The reason why this is all so relevant to site structure is that we can now see where we want to push people to reach the next stage in their journey. For example, if a person lands on Michael’s regular or sustainability blog, we now know that we want to get them from the awareness stage of the funnel to consideration. By using call-to-action buttons and internal linking, we can guide visitors from these pages to the product pages which represent a much higher page value.
In addition, we can also capture customer information from these pages and feed them back into the loop using marketing automation. We can do this via email drip-feeds. Imagine if we have an exit-intent pop-up on a blog page that captures emails. We then segment these customers into an email list called “blog visitors” and send them a series of follow-up emails that encourages them to take a look at some best-selling products. We have now recaptured some potential customers that would otherwise have been lost and moved them along to the next stage of the customer journey!
Step 2 – Choose An eCommerce Theme
Now that we have our site structure in place, we can now start to think about what our store is going to look like. First, though, it is important to remain grounded. A common mistake we see when companies get excited about eCommerce website development is the tendency to overdesign. Let’s take the Shopify platform for example. There is a reason why Shopify is Canada’s third-biggest public company – because it does eCommerce well. Very well. It provides pre-built functionality and stylish easy-to-use theme designs that WordPress can only dream of. What’s more, these theme designs have been developed with user experience and SEO in mind, and premium themes typically have great site speed and performance. In summary, Shopify web development is geared towards great UX, and Shopify’s SEO isn’t too bad either.
With this in mind, let me ask you this. Why on earth would you want to go and completely design a Shopify theme from scratch by customising every part of your site? Why do you think that you know better than a multi-billion dollar organization that employs some of the best theme developers on the planet? Why not take advantage of Shopify’s mission – to provide people with the tools to create eCommerce sites that sell straight off the shelf? You wouldn’t – unless that is, you’re part of a bigger organization with very specific design and functionality needs, plus a team of professional website designers. In the case of Michael’s Cycles, a standard Shopify theme will do just fine, thank you very much.
The same goes for WordPress and WooCommerce. There are hundreds of great eCommerce WordPress themes built for WooCommerce that do most of the heavy lifting for you. So if you’re a small business, browse the web for highly rated Shopify or WooCommerce WordPress themes, choose one you like, and install it on your chosen platform.
What If I Need More Customisation?
If you find yourself in a position where the standard customisation features provided by Shopify and its hundreds of themes are insufficient, then you’re probably better suited to not using this platform. Customising Shopify themes beyond their out-of-the-box limitations requires knowledge of liquid code, and the drag-and-drop page builder apps on the Shopify store (such as Gempages and Shogun) are, in my experience, unbelievably buggy.
However, I encourage anyone thinking that they need something more customisable and unique for an eCommerce store to ask the simple question, “why?” If you haven’t got a good enough answer, then maybe reconsider.
Typical Design Process
However, if you do go through the design route from scratch, a typical process is as follows:
- Empathise / Understand the problem
- Research / Define / Analyse user needs
- Ideate and Design an answer to the problem
- Prototype a solution
- Launch & Test the prototype with a real audience
- With the data, go back to step 4 and go again until the solution works.
The beauty of the pre-built theme solution is that steps 3 – 6 have already been done for you (at least to some extent). The pre-built them already covers steps 3 & 4 (along with mapping out your structure as we have already mentioned), plus it’s likely to have been tested numerous times to optimize the user experience. Of course, it’s always good to test your store to see how the theme works with your products and your branding, but if you’re not selling, it’s unlikely to be poor theme design.
However, if you’re still set on designing your own custom site (and have the budget to do so), then now is the time to think about wireframes.
Wireframes
Wireframes are like the blueprint of a webpage. They make up the outline of the page and segment off areas where text, images, buttons and other elements are to be included. Below is an example of a wireframe for a CBD website homepage made using Invision.
As you can see, it’s pretty bare-bones, but it gives a clear understanding of where each element exists on the page. Most importantly, it doesn’t take long to throw together, and it allows for much quicker changes in design. Believe me, it’s much better to have to make changes to a wireframe than a fully-functional website, I can tell ya.
Mockups
Once you’ve built out your wireframes, now you can start to add the user interface to your design. This is the point at which you can add images and styling that will bring out your brand and give your site a unique look and feel. This mockup is the penultimate design before going into actual website development.
Development
Here’s where you can finally begin to mould your prototype design into a functional website. If you have significant design customization requirements, then you’re going to either need an in-depth knowledge of front-end coding or use a drag and drop editor. As mentioned before, Shopify is not the platform for this approach; WordPress with WooCommerce is much more viable. This is due to the existence of WP Bakery and Elementor. Both of these popular plugins enable you to design a webpage pretty much exactly the way you want it, and, dependent on the WordPress theme you go for, will probably have either built into it for you to use.
Step 3 – Inputting Your Content
Whether you’ve spent the time developing your site, or gone through the far more time-efficient process of choosing a great Shopify theme and installing it, the next stage is to add your content to it. This is the point at which the site really becomes yours.
This includes absolutely everything unique to your site, such as:
- Imagery
- Copy
- Product information
- Apps or Plugins for specific functionality
- Payment methods
To be honest, that’s pretty much it. If you provide all of this for a well-designed theme, you’re away to the races.
Step X – Eat, Test, Iterate, Repeat
This should leave you with a well-structured, brilliantly designed, content-rich site. So you’re done, right? Your site is as perfect and as well-optimized as it can possibly be. Umm, how can I put this politely… absolutely bloody not!
There is one reason above all others why we always encourage our eCommerce clients to use a standard theme and not go through the rigmarole of a slow, arduous design process. It’s all down to us preferring to make decisions driven by data not by hunch. With that being said, this leads us to step X in our process, testing and iterative improvement.
A/B testing is not something that is particularly revolutionary when it comes to improving websites, which is why there are some amazing tools that help to guide design improvements. Some of these tools include programmes like Hotjar and Lucky Orange that reveal how users interact with web pages, revealing heatmaps of the most clicked on areas of a page and the percentage of users who reach a certain spot below the fold. Even good old Google Analytics can reveal areas to improve upon with a little digging – for some insight into how to extract value from this great tool even as a newbie, you can check out our article on Google Analytics for Beginners.
All of these analysis tools, or even observations by a member of your team or perhaps insight drawn from a customer complaint, can help inspire interesting UX hypotheses to test. To test design changes, there are several applications that can be used – one such tool is Google Optimize.
Google Optimize
Google Optimize happens to be our absolute favourite A/B testing tool. It allows pretty much anyone to adjust anything they like on a given web page and see how people’s behaviour changes. These behaviours are tracked by key metrics such as revenue and – most importantly for eCommerce sites – conversion rate. Conversion rate is the percentage of people who land on a webpage that then go on to make a sale, in other words, they have converted.
If you run a test that proves to drive key metrics (Optimize enables you to segment tests to target only specific users too like mobile visitors or only paid traffic) you should then go and make the change on your site. This is the only point where we like to bring developers into the mix to make changes that actually herald results. Then, once you’ve run one test, test again, and again, and again. That’s it, a tried and tested method that simply works.
eCommerce Digital Marketing Strategies
So now you have your brand spanking new eCommerce site and it looks like the business. What’s more, you have a robust design improvement process that can improve your site’s UX month-on-month and is backed by real-life customer data, but what now? Well, now is the time to start getting some more traffic to your website and exploring some eCommerce digital marketing strategies, and there’s a lot to get stuck into. These strategies, to name but a few, include:
- Blogging and Content Marketing
- Social Media Marketing
- Reviews
- Email Marketing
- Paid Advertising
- Podcasting
If you’re interested in learning more about the strategies you should be employing to help your store, then take a look at our in-depth guide on how to help increase eCommerce sales.


